Building a pallet planter is an easy DIY project. When laying down flat, they look like wooden platforms. But when set upright, pallets can become vertical wall planters or raised garden beds deep enough to grow vegetables, herbs, trailing plants, flowers, and more. It can also be mounted as a fence pallet planter in your backyard.
Making a pallet planter is a fun, fast, and easy project you can do with a pallet or two in just a couple of hours during the afternoon. Pallet planters typically last for three to six years. Also, pallet planters are a very affordable option compared to purchasing raised container garden planters.
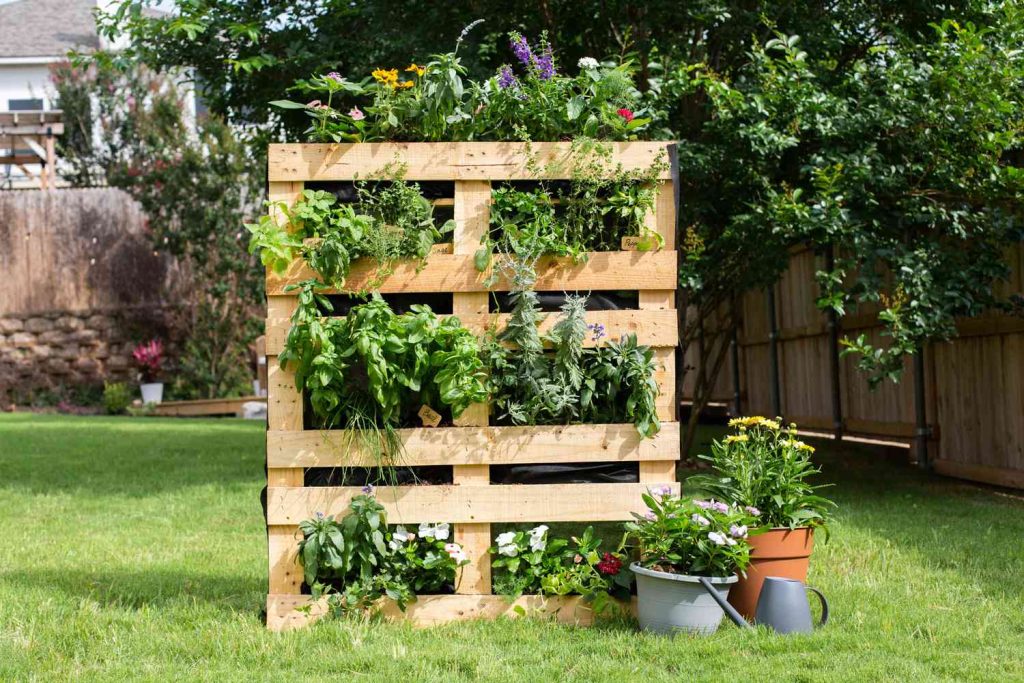
This vertical pallet planter project gives you a wall of four planters. Follow our step-by-step guide to build your own pallet planter.
Warning
When finding a pallet to use, avoid chemically treated pallets marked “MB” for methyl bromide, which can be toxic. The safer option is using a pallet stamped “HT,” indicating it has been treated with heat rather than chemicals.
Parts of a Pallet That Become a Planter
- Top deck boards: Pallets 48 x 40 inches usually have seven top deck boards, and 30 x 30-inch pallets have five. After being converted to a pallet planter, the top deck boards will form the planter’s front wall.
- Bottom deck boards: On the bottom are five deck boards for the larger 40-inch pallets and three for the smaller 30-inch pallets. As a pallet planter, the bottom deck boards will form the backs of individual planter boxes.
- Stringers: Stringers are the 2 x 4s that run perpendicular to the top and bottom deck boards. There will be two side stringers and one center stringer. The stringers will form the sides of individual planter boxes as pallet planters.
What You’ll Need
Equipment / Tools
- Hammer
- Staple gun and staples
- Sandpaper
- Tape measure
- Utility knife or scissors
- Gardening tools
- Paint brush/roller (optional)
- Drill (optional)
- Wedges (optional)
Materials
-
1 to 2
wood pallets - Galvanized nails
- Deck screws
- Landscape fabric
- Potting soil
- Plants
- Pea gravel or drainage rocks (optional)
- 2 1 x 6, each 8-foot (optional)
- Paint or other coating (optional)
- 1 x 4 (as needed)
Instructions
How to Build a Pallet Planter
-
Repair, Replace, or Remove Deck Boards
Repair or replace any missing or damaged top or bottom deck boards. Use a second pallet to match the size, color, and texture. If you do not have a second pallet for parts, use 1 x 4 lumber.
If the pallet has multiple boards close together on the top deck, remove some of them using the hammer to create space between slats, saving the wood you remove to be used later. Remove every other slat, keeping the slat at the top and the bottom.
-
Remove the Nails
Using the hammer, remove any exposed nails from the removed slats and dispose of them.
-
Turn the Pallet on Its Side
Turn the pallet vertically on one side, with the bottom deck boards facing you. Orient the pallet with the deck boards running horizontally (or parallel to the ground) and the stringers running parallel to you.
-
Add Interior Slats
Insert the boards you removed into the center of the pallet, lining up each board with a remaining slat on the top and placing the boards parallel to the ground. (These will form the bottoms of the boxes.) The slats should rest on the interior stringers.
The top slat and the just-added board should form a sort of box shape. If necessary, use wood from another pallet or 1 x 4 lumber instead of the slats you removed.
Nail the slats in place using the galvanized nails and a hammer. Pre-drilling the holes will eliminate the risk of splitting the wood.
-
Lay the Pallet Down
Lay the pallet down, with the top flat against the ground and the bottom facing up.
-
Add the Back Slats
Nail one more slat (either removed from the top, from another pallet, or pieces of one-by-four lumber) to the bottom of the pallet, lining it up with the sideways slat you secured in the middle of the planter in step four.
If needed, add back slats to the top and bottom planters, too, though depending on the style of your pallet, they may already be in place.
You should now have four finished planter boxes—three inside the planter and one on top.
-
Sand and Finish the Wood
Sand the wood to remove any rough spots. If desired, sand less vigorously to achieve a rustic appearance.
-
Staple the Landscape Fabric
Set the pallet upright again, with the top facing you and the planter boxes you’ve formed facing upward.
Line the inside of each planter box with landscape fabric, stapling it in place.
Cut off a section of landscape fabric large enough to cover the entire back of the pallet. Staple it into place from the outside.
-
Place the Pallet
Stand the pallet upright and lean it against a wall, with the side covered in landscape fabric against the wall. Or, drive screws through the bottoms of the top deck boards to attach the planter to an exterior wall if you want it attached. You can mount the pallet high on a sturdy wall for a planter.
If you prefer to leave the planter standing alone, ensure it’s stable. Add wedges or stabilizers to the base to keep it upright if necessary.
-
Add Soil and Plants
Add potting soil to the planter boxes. Plants such as petunias, plants with trailing flowers, or herbs are recommended. Heat or drought-tolerant plants are also recommended.
Choosing Plants for a Pallet Planter
Before embarking on your DIY pallet gardening project, you’re probably wondering about the benefits of gardening in a pallet planter. For starters, pallet planters are excellent solutions for small spaces, such as gardening on a balcony, as they use vertical space, saving room. Pallet planters are also easy to move around.
Pallet planters are also quite inexpensive, and the materials can sometimes be free. Repurposing recycled pallets also reduces environmental waste.
Finally, pallet planters can be used for many vegetables, herbs, and fruits, including tomatoes, spinach, strawberries, and kale. Pick plants that stay small, even at maturity, so they don’t outgrow the planter. (For example, mint would outgrow its surroundings within a year.)
Gardening Tips for Pallet Planters
When gardening using pallet planters, keep a few specific considerations in mind.
- Watering frequency: Water plants in pallet planters more often than in-ground plants because pallet planters won’t hold as much moisture.
- Consider drainage: Adjust your watering schedule to avoid any issues or add drainage holes (make sure to add drainage holes before adding the landscape fabric).
- Plan for fertilizer: Use water-soluble fertilizer in your watering can or keep the soil fertile by adding compost.
How to Make a Pallet Planter Last Longer
Seal your pallet planter to ensure it lasts as long as possible. Use sealants that won’t hurt your plants, such as non-toxic wood preserver and non-toxic silicone varieties. Sealing cracks will also be imperative for keeping your pallet planter in tip-top shape, as this will prevent wood rot.
-
Is it safe to plant in pallets?
It’s safe to plant in pallets that have fresh clean wood. Avoid pallets containing oil marks or broken pieces. Look for pallets containing an “HT” stamp which stands for heat-treated. These are safer to use than pallets treated with chemicals or marked “MB,” which can be dangerous if growing edible fruits and vegetables.
-
Where can I get free pallets in my area?
You can snag free pallets at small businesses such as hardware stores, small garden stores, pet stores, etc. Other resources include Facebook Marketplace, Craigslist, or other online swap or sell groups.
-
What pallets should I avoid?
Avoid pallets with oil marks, broken pieces, and other signs of aging. Also, pass on pallets that were chemically treated or stamped “MB.”
-
What plants are best for pallet planters?
Pallet planters are great for many plant types, depending on how deep your growing pocket is and your sun exposure. If you have full sun exposure and a deep pocket, you can grow many things, including herbs, flowers, salad greens, bulbs, and vining fruits and vegetables.
Read the full article here
